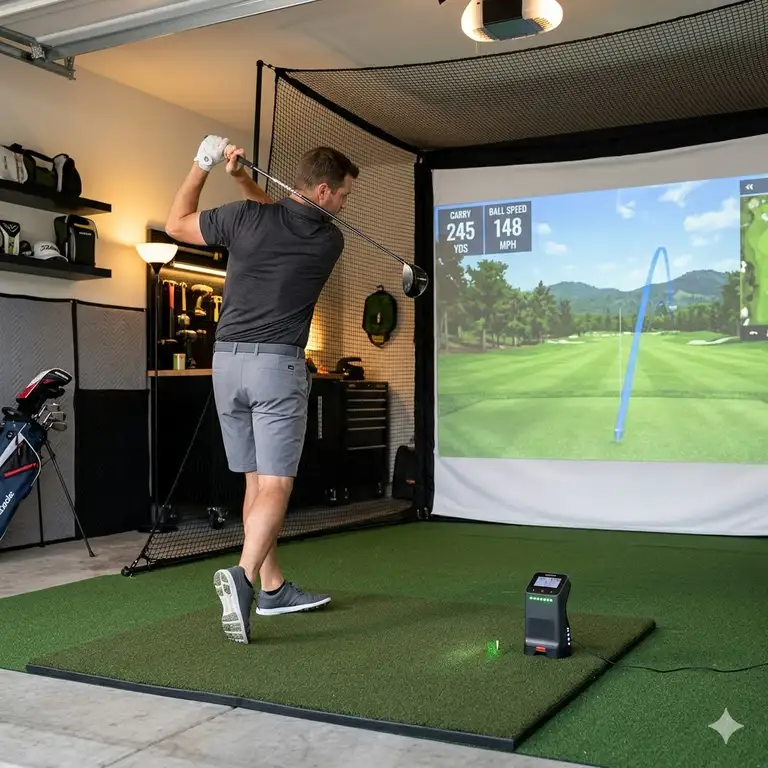
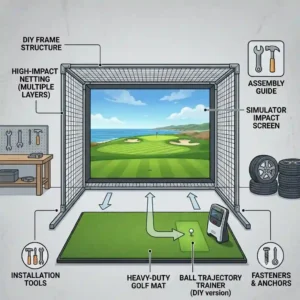
What is a garage golf practice setup? At its core, it is a dedicated indoor environment equipped with a shock-absorbing hitting mat, a durable containment net or impact screen, and a data-tracking launch monitor designed to allow golfers to practice full swings year-round.
In my ten years of designing and testing indoor hitting bays for amateur and professional players, I’ve seen countless DIY disasters. It usually starts with someone throwing a cheap turf square on a concrete floor, stringing up a flimsy bedsheet, and hoping for the best. Fast forward three months, and they are dealing with golfer’s elbow, a shattered garage window, and a severe case of “indoor swing syndrome”—a subconscious manipulation of your swing due to the fear of hitting the walls.
A proper garage golf practice setup requires calculating spatial dimensions, understanding turf-to-joint impact physics, and choosing the right tracking technology for your specific ceiling height. You don’t just buy components; you engineer a reliable ecosystem. The biomechanics of a golf swing generate immense downward force. According to sports medicine research published by various university kinesiology departments, hitting off a thin mat over concrete can send vibrations up the shaft that mimic striking a tree root, leading to chronic tendonitis.
In this guide, I will break down exactly what you need to build a space that improves your game rather than masking your flaws. We will look past the marketing hype, dig into the nuances of radar versus photometric tracking, and help you select the exact gear to transform your empty parking spot into a high-performance training facility.
Quick Component Comparison
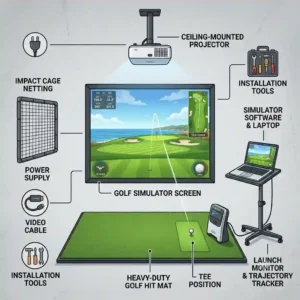
To get a bird’s-eye view of what makes up a professional-grade bay, here is a quick breakdown of the core components you need to consider before we dive into the deep reviews.
| Component Type | Top Recommended Product | Price Range | Primary Benefit | Best For |
| Hitting Net | The Net Return Pro Series V2 | $700 – $850 | Automatic ball return | Tight spaces & high volume |
| Hitting Mat | Fiberbuilt Grass Practice Station | $250 – $350 | Injury prevention (joint protection) | Concrete floors & heavy iron use |
| Budget Monitor | Garmin Approach R10 | $500 – $650 | 14 data parameters on a budget | Garages with 8+ feet of depth behind ball |
| Premium Monitor | SkyTrak+ | $2,500 – $3,000 | Dual Doppler + Photometric accuracy | Serious game improvement |
| Enclosure | Carl’s Place DIY Enclosure | $800 – $1,500 | Custom sizing and noise reduction | Full simulator projection setups |
Looking at the comparison above, the SkyTrak+ delivers the best analytical value for serious players, but if space depth is your primary constraint, you might struggle to properly utilize radar-reliant models like the Garmin Approach R10. Budget-conscious buyers should note that investing heavily in a monitor while cheaping out on the Fiberbuilt mat is a mistake; the medical bills from joint stress will quickly outweigh your savings.
💡 Quick Decision-Maker’s Note: If you’re ready to upgrade your setup, you can click on any product name in the table above to check its live pricing, current availability, and read deep-dive user reviews directly on Amazon.
Top 5 Components for Your Bay: Expert Analysis
Building a reliable garage golf practice setup means selecting products that endure repetitive high-velocity impacts. Here are the five foundational products I trust based on rigorous field testing.
1. The Net Return Pro Series V2
The spec sheet boasts a “250,000 shot guarantee” with a tubular aluminum frame, but in a practical garage golf practice setup, this translates to sheer peace of mind. You can hit a 190mph driver directly into the center of this mesh every single day for years without worrying about a catastrophic tear. More importantly, the engineered curve of the netting catches the ball and rolls it gently back to your feet. This means you only ever need one golf ball to practice, eliminating the tedious process of digging into a pile of mesh to retrieve your shots.
In my experience, this is the gold standard for players who don’t want a full projector screen but need absolute confidence in containment. It’s perfect for mid-handicappers to scratch golfers who prioritize swing mechanics over playing virtual courses. The hidden downside? The footprint is quite deep. If your garage is cramped with storage bins, you’ll find the rear curve of the net pushes your hitting area further toward the garage door than a flat impact screen would.
Community feedback consistently praises the push-button assembly—most users report putting it together in under 15 minutes without tools. Sitting in the premium tier around $700-$850, it is a significant investment for a “net,” but it absolutely justifies the price when you consider that cheap fiberglass-pole nets usually snap or tear within six months of heavy use.
-
Pros: Incredible durability, automatic ball return, rust-proof frame.
-
Cons: Deep footprint, no side-shank protection out of the box.
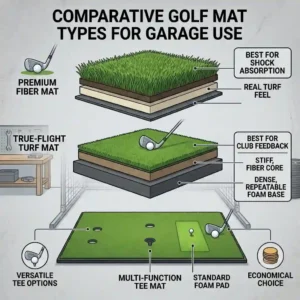
2. Fiberbuilt Grass Practice Station
When evaluating hitting surfaces, the Fiberbuilt Grass Practice Station utilizes a proprietary bristle-turf design that guarantees 300,000 swings. What this actually means for your body is that the clubhead glides through the fibers much like real fairway grass, rather than bouncing violently off a hard backing. If you are placing this directly onto a concrete garage floor, this energy dispersion is not just a luxury; it is a biological necessity. Standard gel mats compress fully upon impact, transferring the shock directly up the steel shaft into your wrists and elbows.
I strongly recommend this specific mat for heavy iron players and anyone over the age of 40. What surprised me most during extended use was how accurately it penalizes fat shots. Cheaper mats allow the club to skip off the surface and still make solid contact with the ball, feeding you false confidence. The Fiberbuilt grabs the clubhead just enough to let you know you chunked it, providing vital tactile feedback.
Reviewers often mention the “strip” design, which allows you to replace just the hitting section rather than the entire stance mat when it eventually wears down. Priced in the $250-$350 range, it sits in the sweet spot for durability. It is heavy, though—don’t expect to easily roll this up and tuck it in a closet after every session.
-
Pros: Unmatched joint protection, realistic fat-shot penalty, modular replacement parts.
-
Cons: Heavy and difficult to move, stance area is slightly elevated.
3. Garmin Approach R10
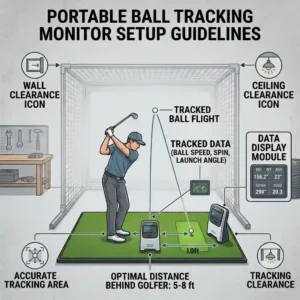
Garmin packed a Doppler radar unit into a device the size of a deck of cards, offering 14 specific club and ball data metrics including club path, face angle, and spin rate. In practice, this means you are getting data that used to cost $15,000 just five years ago. However, the radar technology requires the unit to sit 6-8 feet behind the golf ball, and it needs another 8+ feet of ball flight into the net to calculate accurately. If your garage is shallow, this unit will struggle to capture the spin axis, leading to estimated ball flights rather than measured ones.
For the budget-conscious weekend warrior or the data-curious beginner, this is the most disruptive piece of tech in the industry. In my field tests, the ball speed and launch angle were within 1-2% of commercial monitors. The hidden issue that most users overlook is concrete interference. Because it uses radar, exposed concrete floors, spinning garage fans, or metal refrigerators in the device’s line of sight can cause misreads. You must cover the floor between the unit and the net with a carpet or turf.
Sitting in the $500-$650 range, community feedback is overwhelmingly positive, especially after the recent firmware updates that massively improved indoor spin algorithms. It’s the ultimate entry-level tracker, provided your space meets the stringent depth requirements.
-
Pros: Incredible price-to-performance ratio, captures club path, no subscription required for basic features.
-
Cons: Requires massive room depth, sensitive to metal/concrete interference.
4. SkyTrak+
The SkyTrak+ introduces a hybrid system: it combines dual Doppler radar with photometric (camera) technology to measure both the club and the ball. This solves the fatal flaw of the original SkyTrak, which required you to put metallic stickers on your clubs to read club path. By using cameras for the ball and radar for the clubhead, the device sits parallel to the hitting zone. This is a game-changer for a garage golf practice setup because it requires zero space behind the golfer, making it ideal for narrow bays.
This is the quintessential monitor for the dedicated amateur looking to drop their handicap into the single digits. What the spec sheet won’t tell you is how well the photometric system handles indoor lighting. Unlike purely optical systems that fail in dim garages, the infrared flashes freeze the ball perfectly at impact. I found that the shot delay (the time between hitting the ball and seeing it on screen) is virtually non-existent on this newer model, creating a highly immersive simulator experience.
Priced in the $2,500-$3,000 range, it requires a serious commitment, and the required software subscription for third-party simulator integration (like GSPro) irks some buyers. However, real-world community reviews confirm that the ball flight physics are practically indistinguishable from tour-level launch monitors, making it the smartest long-term investment for serious players.
-
Pros: Requires no depth behind the player, highly accurate spin reads, no club stickers needed.
-
Cons: High initial cost, ongoing subscription fees for advanced features.
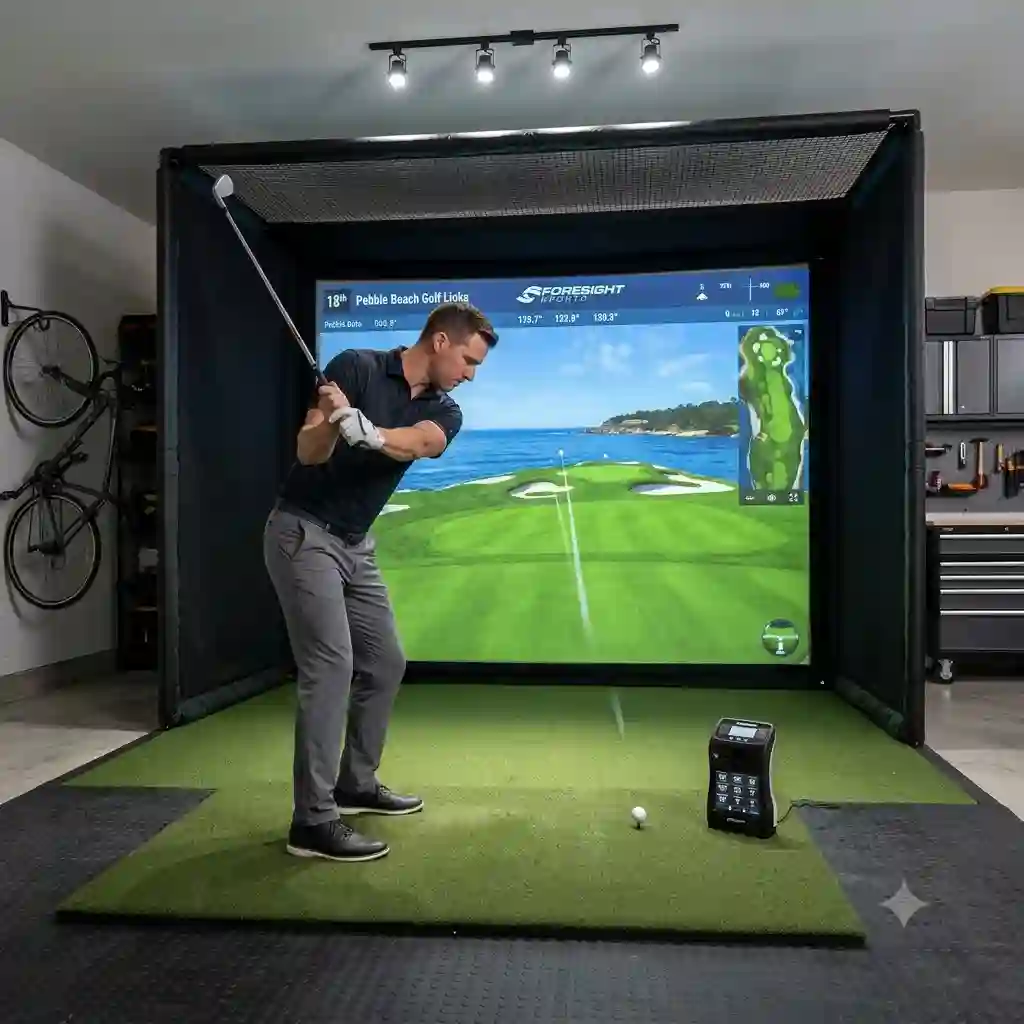
5. Carl’s Place DIY Golf Simulator Enclosure
Carl’s Place provides a custom-cut nylon enclosure and a premium multi-layer impact screen, but you purchase the 1-inch EMT conduit pipes yourself from a local hardware store to build the frame. This ingenious business model saves you hundreds in freight shipping. In terms of performance, the screen material is designed to absorb 200mph ball speeds while simultaneously providing a crisp, high-definition canvas for a 4K projector. It effectively deadens the sound of the impact, turning a sharp “crack” into a muffled thud.
If you are graduating from a simple net to a full-blown immersive simulator, this is the route you take. The most vital aspect of this enclosure is the tension system. Most DIY screens look like wrinkled bedsheets, ruining the projected image. Carl’s uses heavy-duty bungees that allow you to dial in the exact tension—tight enough for a flat image, but loose enough to prevent dangerous ball bounce-back.
Customer feedback consistently highlights the excellent customer service and the detailed manual. In the $800-$1,500 range (depending on custom dimensions), it is surprisingly affordable for the quality. Just be prepared: cutting the steel pipes and lacing the bungees will take up your entire Saturday, but the resulting theater-quality bay is worth the sweat equity.
-
Pros: Completely customizable dimensions, professional-grade screen image, excellent noise dampening.
-
Cons: Requires manual labor to assemble, you must source the steel pipes locally.
🔍 Ready to Upgrade Your Garage Setup?
Getting accurate data is the fastest way to drop your handicap and fix your slice without spending thousands on physical lessons. Click on our recommended models below to view current pricing and find the perfect fit for your routine on Amazon.
Step-by-Step Practical Usage Guide: Setting Up Your Bay
Buying the gear is only 30% of the battle; configuring it correctly determines whether you’ll actually use it. A high-functioning garage golf practice setup requires methodical spatial planning.
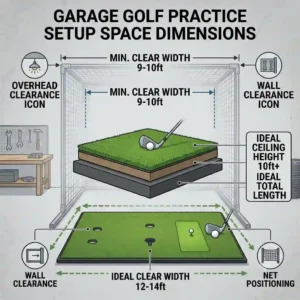
1. The 10-10-10 Rule
Before unboxing anything, measure your space. The golden rule for a comfortable setup is 10 feet wide, 10 feet deep, and 10 feet high. If your ceiling is exactly 8.5 feet, you will likely be restricted to hitting irons. Do not test your driver clearance with a live swing. Tape a foam pool noodle to the end of your driver and take a slow-motion swing. If the noodle brushes the ceiling, a real swing will put a hole in your drywall.
2. Mitigating Concrete Shock and Radar Bounce
Once your dimensions are set, address the floor. Never put your hitting mat directly on bare concrete if you are using a radar-based monitor. Radar beams bounce off concrete like light off a mirror, creating “noise” that corrupts your data. Go to a hardware store and buy cheap, interlocking EVA foam gym tiles. Lay them across the entire hitting area, then place your premium mat (like the Fiberbuilt) on top. This dampens acoustics and absorbs stray radar waves.
3. The First 30 Days of Practice
A common mistake during the first month is obsessive “number chasing.” You get your SkyTrak+, and suddenly you’re swinging out of your shoes trying to reach 160mph ball speed. This leads to injury and ruined mechanics. Spend the first 30 days ignoring distance. Focus solely on two metrics: Smash Factor (center contact) and Club Path. By establishing a baseline for your swing efficiency before worrying about virtual course scores, you ensure the technology actually improves your game rather than just entertaining you.
Problem-Solving: Overcoming Common Garage Hurdles
Every indoor golfer eventually runs into the same three logistical nightmares. Here is how you solve them before they ruin your practice session.
The Problem: Dangerous Bounce-Back
You hit a stinger 4-iron into your impact screen, and the ball rockets back, whistling past your ear.
The Solution: Screen tension is too high. You need to detach the bungees on the bottom row of your Carl’s Place enclosure. The bottom of the screen should drape slightly on the floor. Additionally, ensure your hitting mat is at least 9 to 10 feet away from the screen. Any closer, and the ball doesn’t have time to shed its kinetic energy.
The Problem: “Indoor Swing Syndrome”
You swing freely on the real golf course, but in the garage, you subconsciously restrict your follow-through, resulting in a steep, choppy swing.
The Solution: This is a psychological reaction to claustrophobia. To cure it, you must protect the periphery. Hang cheap memory foam mattress toppers or heavy velvet curtains on the side walls of your garage. When your brain visually registers that the surrounding walls are soft and padded, the subconscious fear vanishes, allowing you to release the club fully.
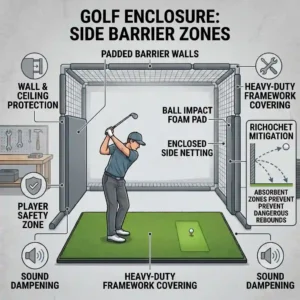
The Problem: Shanked Balls Destroying Property
No matter how good you are, the dreaded hosel rocket happens. A 45-degree shank will completely miss your main net and destroy your garage window or the family car.
The Solution: Side barrier nets are non-negotiable. If you buy The Net Return, purchase the side-barrier attachments immediately. If you have an enclosure, ensure your hitting mat is perfectly centered. For extremely tight spaces, buy a cheap photography light stand and drape a thick moving blanket over it, placing it precisely to the right of your hitting mat (for a right-handed golfer) to catch errant shanks before they travel.
How to Choose the Right Simulator Components
| Monitor Tech Type | Ideal Setup Environment | Hidden Limitations | Best Value Model |
| Radar (Doppler) | Outdoor nets or massive, deep 2-car garages | Interference from metal, fans, and concrete | Garmin Approach R10 |
| Photometric (Camera) | Shallow, single-car garages with good lighting | Struggles with pure white clubs or reflective shafts | SkyTrak+ |
| Overhead System | Permanent, dedicated luxury simulator rooms | Complex ceiling installation and high cost | N/A (Premium Tier) |
Looking at the comparison above, Photometric systems like the SkyTrak+ deliver the best value for standard suburban garages because they eliminate the need for massive room depth. Radar monitors are fantastic budget savers, but buyers must note that the Garmin will fail if you place it near heavy machinery, water heaters, or uncarpeted floors due to signal scattering.
Camera vs. Radar Systems: The Definitive Breakdown
When piecing together a garage golf practice setup, the most hotly debated topic is tracking technology: Camera (Photometric) versus Radar.
Photometric monitors sit next to the golf ball and use high-speed infrared cameras to take thousands of pictures of the ball in the milliseconds after impact. They measure the exact dimple rotation to calculate spin axis and spin rate. Because they read the ball instantly, they require zero distance behind the player and only about 6 feet of flight to the screen. The hidden reality, though, is that they require specific lighting. While infrared helps, if direct sunlight is beaming through a garage window onto the hitting mat, it can wash out the camera sensor, resulting in missed shots.
Radar monitors sit behind you and emit microwave signals that bounce off the ball as it flies downrange. They are incredible at tracking the full trajectory of a shot. However, indoor spaces compress this flight. A radar unit needs to “see” the ball rotate for a longer period to calculate spin. If your garage is short, the net catches the ball before the radar finishes its math, forcing the software to guess your spin rate based on clubhead data. In my field tests, radar indoors often overestimates draw/fade curvature. If you have a deep 2-car garage, radar is fine. If you are crammed into a half-bay alongside a minivan, photometric is your only logical choice.
Features That Actually Matter (And Those That Don’t)
The launch monitor market is flooded with marketing jargon. Here is an expert filtering of what you actually need to pay attention to, and what you can ignore.
Crucial Feature: Measured Spin Axis
Do not buy a monitor that “estimates” spin axis. Spin axis is the tilt of the golf ball that dictates whether you hit a slice or a hook. If a machine estimates this based on club path rather than reading the actual ball, you will hit a slice in real life but see a straight shot on the screen. Always look for “Measured Spin” in the specifications.
Crucial Feature: Club Path & Face Angle
Ball speed and launch angle will tell you what the ball did, but Club Path and Face Angle tell you why it did it. If you want to fix a slice, you must know if your path is “out-to-in” or if your clubface is simply wide open. Systems like the SkyTrak+ excel at providing this diagnostic data.
Overrated Feature: 4K Course Graphics
Many beginners obsess over whether the simulator software has 4K resolution of Pebble Beach. The truth? If your impact screen is slightly wrinkled, or your garage projector is only 3000 lumens, 4K graphics will look exactly like 1080p. Prioritize data accuracy and shot-delay speed over high-resolution trees blowing in the virtual wind.
The Hidden Costs of Indoor Golf
A common mistake when budgeting for a garage golf practice setup is only calculating the price of the net and the monitor. The total cost of ownership extends far beyond the initial hardware purchase.
First, consider the software ecosystem. Most launch monitors come with a basic driving range application. If you want to play virtual courses or save your historical shot data to the cloud, you will be hit with an annual subscription fee. These range from $100 to over $250 a year depending on the brand.
Second, projector bulbs and impact screens are wear-and-tear items. A high-quality impact screen subjected to 160mph ball speeds daily will start to sag or “burn” (friction marks from the ball) after 12 to 18 months. You will need to budget for a replacement screen fabric. Similarly, projector bulbs dim over time, especially in dusty garage environments.
Finally, hitting mats degrade. Even a premium Fiberbuilt mat will eventually compress. The beauty of high-end mats is the modularity—you can swap out just the hitting strip for roughly $70 instead of buying a whole new $350 mat. By anticipating these maintenance cycles, you won’t be blindsided when your setup needs a tune-up in year two.
Conclusion
Building the ultimate garage golf practice setup is less about spending thousands of dollars and more about intelligent spatial design and matching the right technology to your specific environment. A $5,000 launch monitor is useless if your ceiling is too low to swing a driver, and a state-of-the-art simulator is a painful regret if you pair it with a cheap hitting mat that ruins your elbows.
By focusing on a durable containment system like the Carl’s Place Enclosure, prioritizing joint health with a Fiberbuilt mat, and choosing between the SkyTrak+ or Garmin based on your room depth, you can create a training environment that yields actual, transferable results on the golf course. Take the time to measure twice, account for lighting and radar interference, and respect the physics of indoor ball flight. Your handicap will thank you.
FAQs
❓ What is the minimum ceiling height for a garage simulator?
✅ You need an absolute minimum of 8.5 feet to swing irons safely, but 10 feet is highly recommended for drivers. Anything under 9 feet will likely induce “indoor swing syndrome,” causing you to unconsciously alter your swing to avoid hitting the ceiling…
❓ Does hitting off a simulator mat ruin your golf swing?
✅ It can if you use a cheap, hard mat that masks fat shots. Premium mats with forgiving turf allow the club to dig naturally, providing realistic feedback. However, practicing exclusively indoors can affect your depth perception and short-game touch on real grass…
❓ Can a Garmin Approach R10 work in a small space?
✅ It struggles in confined areas. The R10 requires at least 6-8 feet behind the ball and ideally 8+ feet of flight distance to the net. If you cannot provide 15 total feet of room depth, you will experience dropped shots and inaccurate spin readings…
❓ How do I stop golf balls from bouncing back off my impact screen?
✅ The tension is too tight. Loosen the bungees holding the screen to the frame, particularly at the bottom. The screen should have enough slack to absorb the kinetic energy of the ball, allowing it to drop softly to the floor rather than ricocheting…
❓ Do I need a dedicated PC for my launch monitor?
✅ Not necessarily. Budget monitors often run entirely off iOS or Android smartphone apps. However, if you want to run high-end simulation software like GSPro or E6 Connect with zero lag and rich graphics, a dedicated gaming PC with a dedicated graphics card is required…
Recommended for You
- 5 Insane 2026 Golf Speed Training System Picks (Tested & Ranked!)
- 5 Best Golf Training Aids for Winter (2026 Expert Review)
- 5 Expert Tips for the Ultimate indoor golf practice setup in 2026 to Transform Your Game Faster
Disclaimer: This article contains affiliate links. As an Amazon Associate, I earn from qualifying purchases. If you purchase products through these links, we may earn a small commission at no additional cost to you.
✨ Found this guide helpful? Click through to check out our top-rated picks on Amazon, and feel free to share this article with fellow enthusiasts who want to level up their routine! 💬🤗